
A reunion is a truly special event family members can share. Large or small, annually or every few years, relatives or long-lost cousins, the family reunion should be documented for posterity. Recording reunion events encourages participants to remember special moments and preserves family history for your descendants.
There are many ways families document reunions. Some make reunion scrapbooks with photographs and written stories. Some produce keepsake mementos such as recipe or memory books, while others go the high-tech route and record their gatherings on video.
My mother’s family has reunited annually since 1967. We’ve videotaped reunions since 1986, our first theme reunion, a Hawaiian luau. Before 1986, we captured many early reunions on audiotape, 8mm or 16mm film. For our 35th reunion in 2002, I used past remembrances and today’s technology to develop a lasting keepsake celebrating our years together as a family.
I chose to save these memories to DVD (Digital Versatile Disc, formerly Digital Video Disc). DVDs can be created (“burned”) for personal use with the right equipment (a computer with DVD creation/editing software and DVD burner, or a new TV-top model that records content from your television).
Why DVD?
The verdict is still out on the DVD’s life, although a 100-year figure has been advertised. While DVD is a fine “view-only” medium, there is an ongoing debate among technology experts about using CDs and DVDs for archival purposes. Scratches can do enormous damage to CDs and DVDs, and you must be concerned about dust, light and heat until the medium becomes more stable.
Despite efforts to improve storage media, it is wise to keep a high resolution digital master of films or video footage and/or extra copies of a master. These should be stored somewhere other than your home (for example, in a safe deposit box) in case the original or digital master is damaged or destroyed. The recommended format (or archival medium) is DV (Digital Video) or Mini DV, which is already digital, inexpensive and easy to transport to a computer or one of the newer stand-alone units.
In going the digital route, I could have used CD-ROM or VCD (video compact disc). However, the capacity of a CD-ROM is only 650 MB (not enough for my planned project), and VCDs have limited playback capability.
The Project
While it may sound easy, undertaking a project of this scope requires much planning, patience and time. If you’re short on the latter, many companies specialize in converting film and tape to digital format or production of customized CD/DVD. To trust your project to a professional, check the Yellow Pages under “Video Production Services,” or peruse the web. Narrow your search substantially by searching in categories. Evaluate each company thoroughly, checking price lists and service charges such as editing footage, inserting or editing audio tracks, scanning photographs or slides. Ask per copy costs and whether bulk rates are available for converting many films, tapes, photos or slides or for making a large number of copies.
Also consider whether you are willing to risk shipping precious photos, films, slides or tapes or prefer to work with someone closer to home. Most companies ask you to sign a release that you understand they are not responsible or liable for items lost in the mail.
Feeling comfortable with the latest computer technology and open to a creative challenge, I worked on the project myself rather than enlisting the services of professionals.
Where to begin?
When I started this project, I asked myself, “How do you capture 35 years in an hour-long DVD?” It was a difficult task, but with careful planning, I picked and chose fitting memories for inclusion in my special keepsake. Several months in advance I began collecting as much material as I could find. I contacted family members for old photographs, movies and VHS tapes.
Next I decided what format to use to organize all the wonderful images and film/tape footage I’d collected. Even if someone else is performing the conversion and technical work, you must still decide what memories to include. The concept I developed was a story in four chapters (using one large movie for each chapter). The four chapters included photographs, film clips, video segments (singing, dancing and games) and a “grand finale” — a slideshow of pictures set to music to recap the first 35 years.
The Process
Step 1 – capturing images
This step involved acquiring and or/converting all the (still or moving) images. I used a combination of photographs, old 8mm and 16mm film footage and VHS video. I scanned old photographs on a flatbed scanner. Digital camera images were uploaded to my computer. Next, I edited with Adobe Photoshop (image editing software). Cropping removed extraneous background from some images. Older photographs required color adjustment or minor repairs. Finally, limitations of my video creation software (MovieStar for digital video creator II) meant still images had to be sized the same. My 8mm and 16mm film footage was already converted to VHS, so I only needed to convert it to digital format.
Unfortunately, many VHS tapes were recorded with older cameras, so quality was already lacking. Resolution was not improved by transfer to DVD.
Step 2 – exporting video
The next step was transferring the video footage to my desktop PC. This process is quick if your computer has a Firewire port (developed by Apple to transfer video from digital camcorders to PC or Macintosh computers).
Step 3 – editing video
Once video footage was converted to MPEG-2 format, I chose clips to include and edit footage. Using MovieStar, I imported desired clips and photographs and strung them together. For the first movie, I used still images and video clips and introduced an audio track. For movies two and three, I used video footage with sound and just needed to arrange clips in desired order. For the final movie, I used a series of still images set to music. I added text and transitions such as “fade in” to enhance movement and story effects. The final step was to “produce” the clips into four separate movies.
Step 4 – creating the DVD
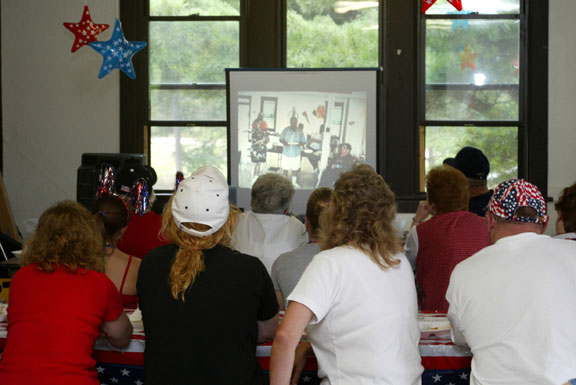
Once I had the four movies I wanted, it was time to create or “author” the DVD. Using DVD-authoring software (MyDVD) included with my DVD burner, I created the DVD. The first step was creating the opening screen (chapter menu). My four chapters were The Early Years, Classic ALAFFFA 1, Classic ALAFFFA 2 and We Are Family.I arranged for each chapter to link to its respective movie (see photo 1). Next, using software (Prassi Primo) that came with my external DVD writer, I set up the video to write to a DVD-Recordable (DVD-R) disc. When I had my final product, I designed and printed a jewel case insert for the storage case (see photo 2).
Step 5 – playing and checking the DVD
Then, I played the DVD on my commercial DVD player. Just make sure your DVD burner is compatible with your consumer DVD player.
Show Time
Finally, time to show my family A Tribute to ALAFFFA: 35 Years of Family Love and Fun. I connected my DVD player to a multimedia projector and showed the movies during our family reunion.
The screening began with the first movie, The Early Years, which showed a photograph of John and Veronica Figlar – the first generation, who taught their children the meaning of family love and devotion. Next were wedding photographs of their seven children, the core ALAFFFA members — John and Anna Alzo, Nick and Helen Lizanov, Mickey and Geraldine Abbott, John “Pee Wee” and Ginny Figlar, Joe and Toni Figlar, Mike and Laurel Figlar and Ben and Margie Augenstein. Film footage of early picnics followed, with a special tribute to the ALAFFFA “Angels” (deceased members) who were always there in spirit. Next was Classic ALAFFFA Moments — singing, dancing, laughing, playing games and good old-fashioned fun. The final movie, We Are Family, was pictures of ALAFFFA-ites through the years, from the oldest to the newest members, interspersed with verses of our family poem, We Will Have ALAFFFA to Remember, set to music.
I distributed copies of this keepsake to family members. Sample clips may be viewed online.
In conclusion, I must note this process was not without fault. I revised many times before I was satisfied. Some VHS tape quality was not the best and did not improve with transfer to DVD. As with most new technology, there were technical glitches during transfer and editing and the learning curves for software programs. A challenge occurred while mixing video clips with audio tracks, several tries were necessary to get everything in perfect sync. In the end, the work was worth it. I now have 35 years of collected memories organized onto one small, playable disc that I hope will survive for years, or at least until technology’s next wave rolls in.
Ten tips for producing a family reunion DVD
- Determine equipment you need. Recommended: A computer with at least 256 megabytes of RAM; video and sound card; DVD writer and Firewire port. Scanner; digital camera at least 2.1 megapixels; cables; capture device card and VCR and DVD players.
- Gather and sort materials; identify who’s who and dates taken.
- Scan photos (get permission from others to use their image) at a resolution of 600 dpi optimal but no less than 300 dpi.
- Convert videotapes or film; do-it-yourself or use a professional company.
- Choose appropriate music to accompany images.
- Edit photos and digital video footage.
- Process (burn) DVD and make copies for family members.
- Design and print jewel case inserts; include title and date produced.
- Show the DVD on a TV or multimedia projector.
- Have fun and enjoy the memories!
About the author
Lisa Alzo lives in Ithaca, New York, and serves as ALAFFFA Family historian. She has a Master of Fine Arts from the University of Pittsburgh. She spent six years researching her family’s history for her book, Three Slovak Women. Lisa is the recipient of the 2002 Mary Zirin Prize given by the Association for Women in Slavic Studies. She is an instructor of genealogy and writing and is an invited speaker for national conferences, genealogical and historical societies.